Introduction
Cloud-based web apps are increasingly becoming the standard way of creating and building applications due to the immense benefits they come with. This tutorial will show you how to build a full-stack cloud-based Instagram clone with AWS Amplify, React, and Tailwind CSS.
AWS Amplify is a suite of services provided by Amazon AWS – the leading cloud service provider. It helps web developers build complete web and mobile apps by providing easy, fast, and intuitive backend configurations. With the AWS Amplify Admin UI, we get a visual interface to create data models, configure our app authentication and authorization, manage users and other available backend services. We can then connect the configured backend with our front end.
For the app UI, we will be using React js and Tailwind CSS. With these two, we can quickly create beautiful and re-usable components for our app.
Here’s a sample of our final project:

Setting up our Backend with AWS Amplify Admin UI
The beauty of AWS Amplify Admin UI is that we are provided with a sandbox environment without needing an AWS account. We can use that to create our app data models while specifying the relationship between each model. The data model schemas are created by AWS Amplify using GraphQL in the background.

We will also be populating our data models with sample data to display in our app.

- Under the “Create an app backend” section, click on the “Get Started” button.
- On the next page, select “Data” under the “Pick a feature to set up” section.
- Then, “Blank schema” under the “Build a data model in the sandbox” section.
- Click the “Create new schema” button.
On the next page, we will be making our schema design.
Click the “add model” as shown below to create our first model.

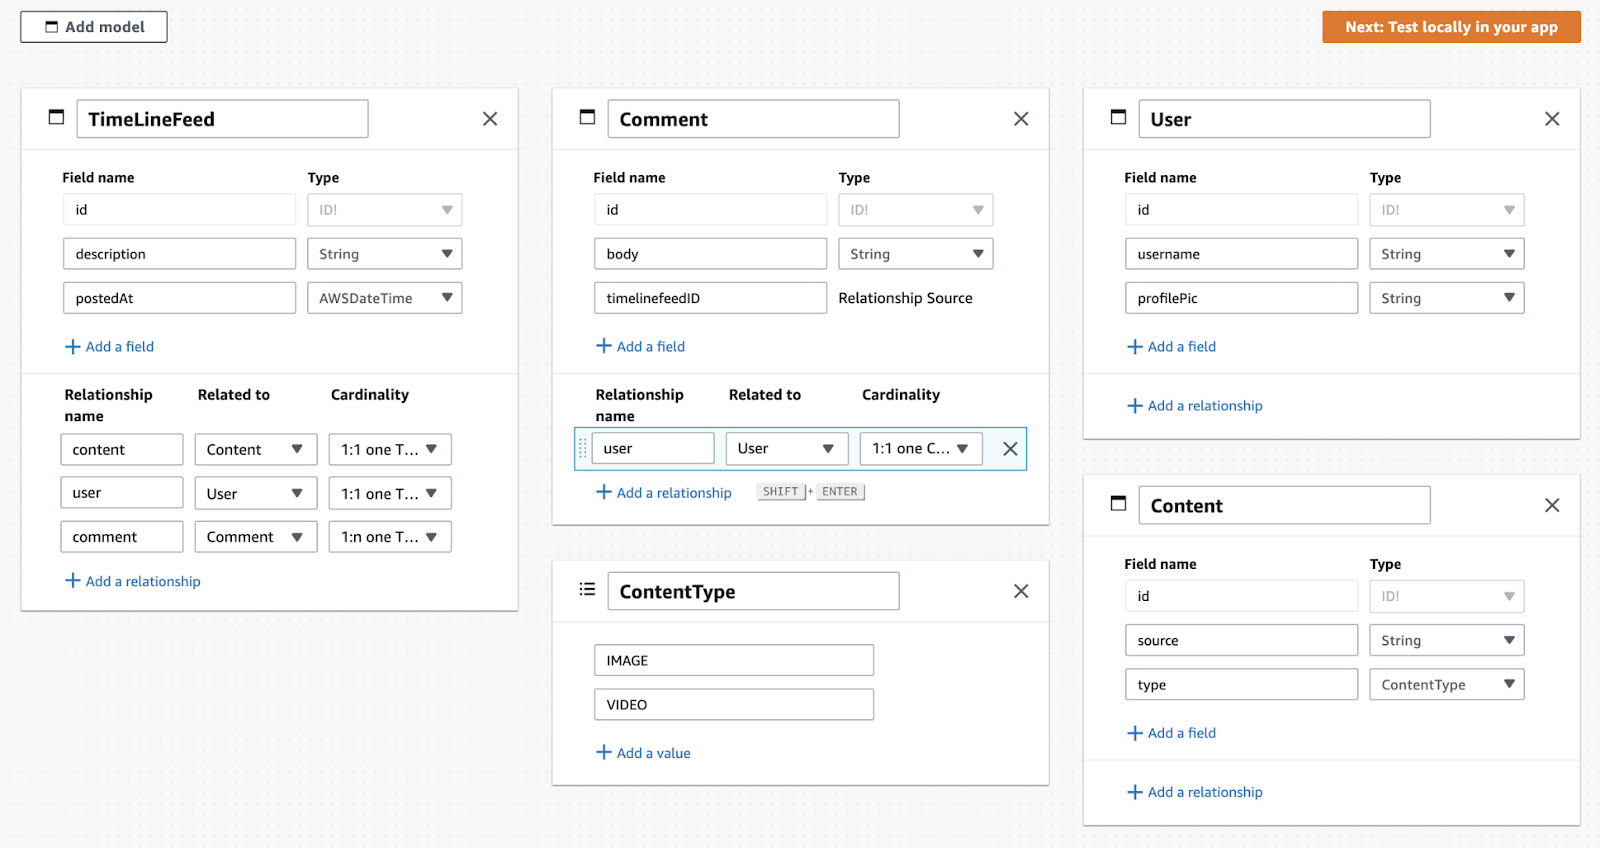
For our app, we’ve got four main models to work with. TimeLineFeed, Content, User, Comment
- For the first model, TimeLineFeed, we will be adding two new fields: description, a String and postedAt, an AWSDateTime field.

Next, we need to create a new relationship by making a 1:1 connection between our TimeLineFeed model with our Content Model.
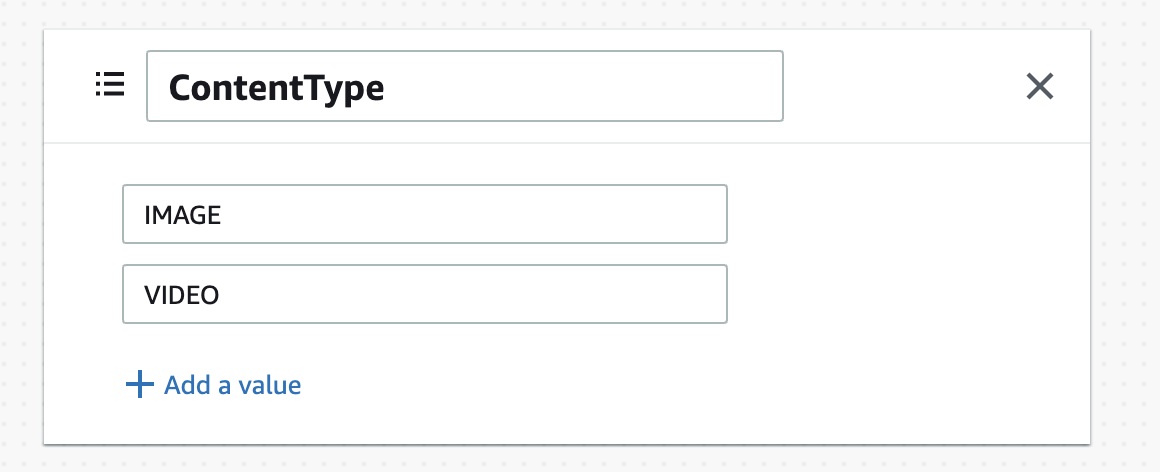
- To create our Content Model, click the “add model” again. This model will also have two fields: “source”, a String and “type” which will be a “ContentType” Enum containing two values – Image and Video. We will have to create this custom enum.
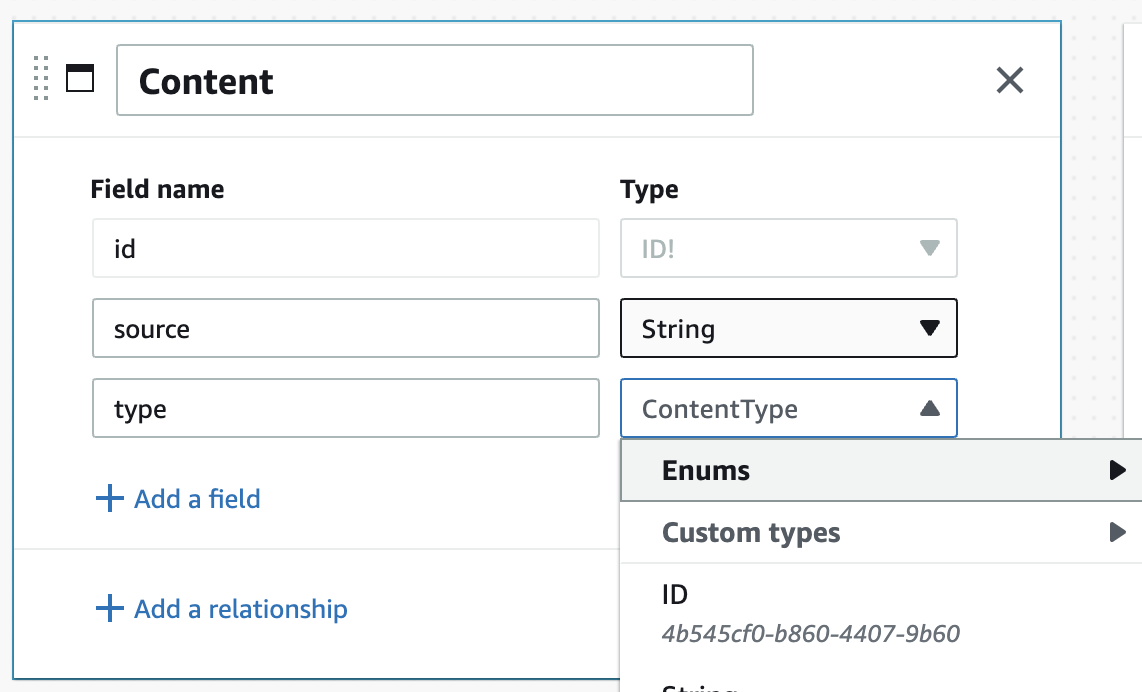
- To create the custom enum, click the “String” dropdown > Enums > create new in the stated sequence.
- Add the two possible values: Image and Video.
- After creating our first two models, it’s time to add our first relationship. Click the “add relationship” button under the TimeLineFeed model. Preferable to have the relationship name in lowercase.


- For our next two data models – Comment and User. Under “Comment”, add one field called body which is a String. “User” will have 2 fields, username, a String and profilePic, also a String.
- Next, we will be adding relationships between the four created data models.
- Add a 1:1 relationship to the Comment model for User
- Also, add a 1:1 relationship to the TimeLineFeed model for User
- Lastly, add a 1:many relationship to the TimeLineFeed model to Comments.
Below is the final schema design.
Connect Backend
Now that we’ve designed our backend schema, it’s time to deploy our backend.
- Head over to the deploy tab. Create an AWS account or connect to an existing AWS account.
- Give the App a name and confirm the deployment. For mine, I used “PhotoFeed”. The deployment might take a couple of minutes.

Adding Sample Data
We will be adding a couple of sample data so we can display them in our React app.
- Open the admin UI and navigate to the Content tab.
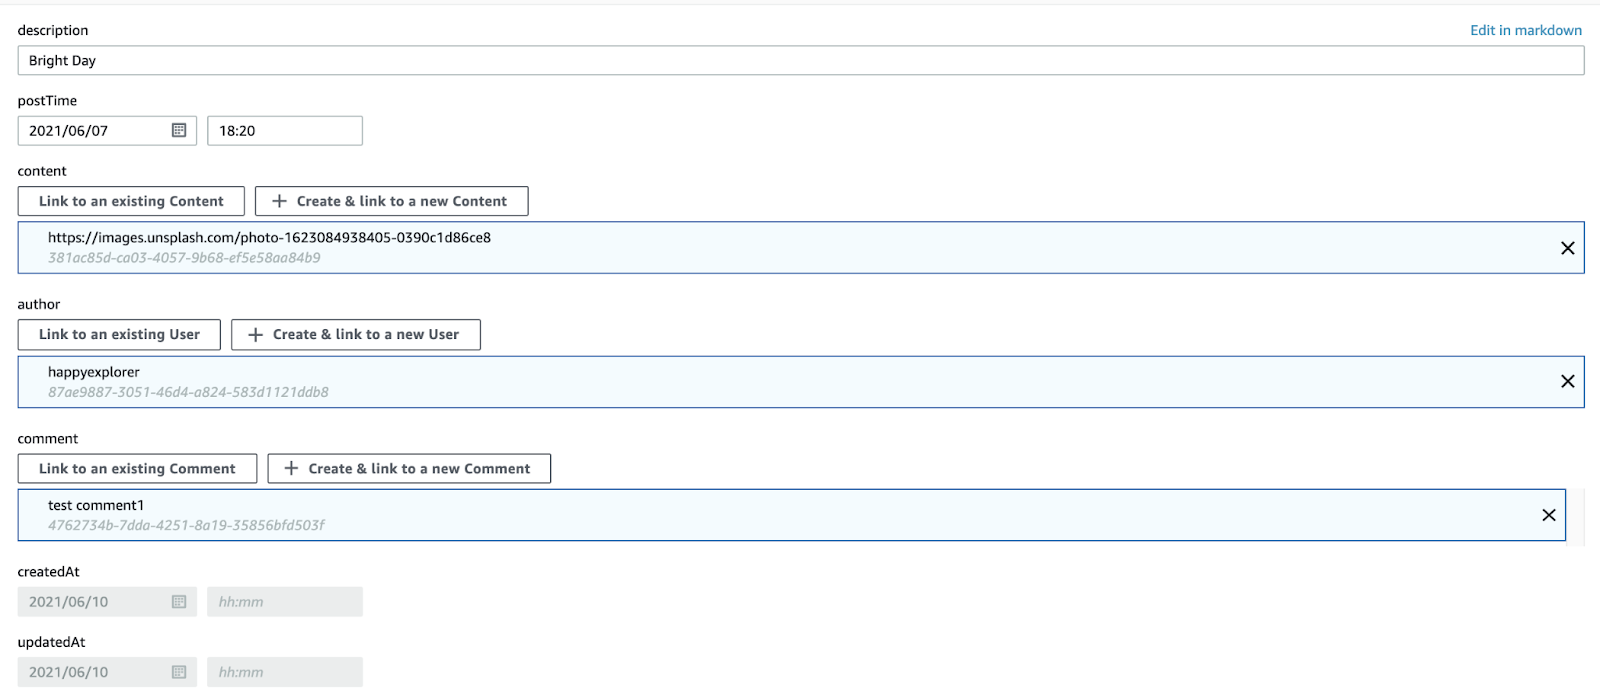
- Click the “Create timeLineFeed” button and add a number of data samples and link to them to user and comments which you will create. Here’s a sample below:
- Feel free to create about three samples whilst using a free image or video sources like Pixabay or Unsplash or Picsum

- Make sure each item has a green tick or the app won’t pull any data. This might take a while though.
Frontend – React and Tailwind CSS
As we will be using Tailwind CSS to style our react app, I thought it would be useful to follow the official Tailwind CSS steps to set up a React app with Tailwind CSS, which you can find here.
First, you set up your project with :
npx create-react-app photofeed
cd photofeed
Follow the remaining steps, which you will find in the official guide. The recommended steps take about 5 minutes.
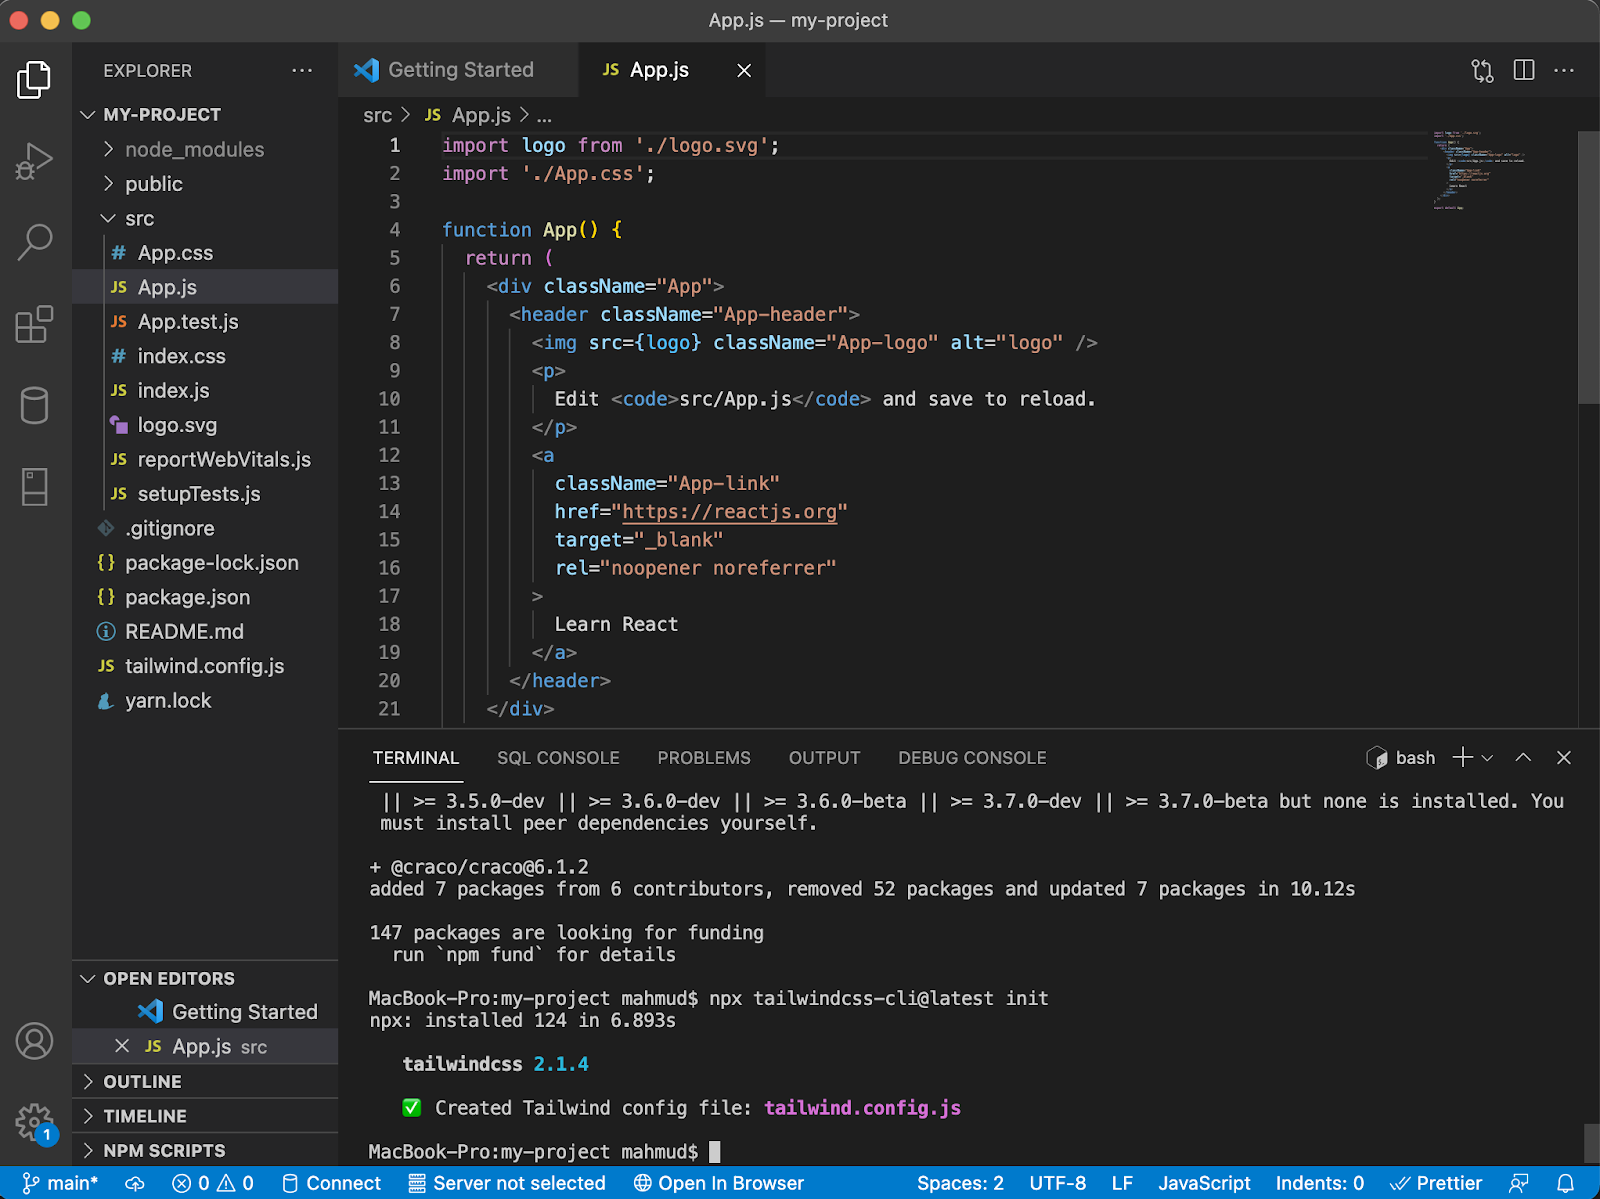
Upon setting up your starter app, your project directory will look like this.
We will also be cleaning up our App.js file like below:
function App() {
 return (
   <div className="App">

   </div>
 );
}
export default App;- Next, run
npm i aws-amplify typescript
- If you don’t have the Amplify CLI installed, also run
curl -sL https://aws-amplify.github.io/amplify-cli/install | bash && $SHELL
- We then have to pull the backend into the react app. To do this, run and follow the prompts accordingly.


- To verify if this worked successfully, check the src > models > index.js folder for the pulled data models.
Querying The Data Models
- First, we will need to configure Amplify in our src > index.js file by adding:
import Amplify from 'aws-amplify'
import awsconfig from './aws-exports'

Amplify.configure(awsconfig)- Next, we will create our components to display the pulled data.
- Create a components folder under src i.e src > components
- Create a PhotoFeed.js file in the components folder. In it, we will query our TimeLineFeed data model and also map the queried data.
import { useState, useEffect } from 'react'
import { DataStore } from '@aws-amplify/datastore'

import { TimeLineFeed } from '../models'

export function PhotoFeed () {
 const [photofeed, setPhotoFeed] = useState([])

 useEffect(() => {
   const getPhotoFeed = async () => {
     const photoFeedData = await DataStore.query(TimeLineFeed)
     setPhotoFeed(timelineData)
   }

   getPhotoFeed()
 }, [])

  return(
     { photofeed.map( (feed) =>
            <PhotoCard  key={feed.id} feed={feed} />
        ) }

  )

}
The official guide explains this beautifully.
Also, the local setup instructions button give us this:

Creating Our Card Component
- Create a PhotoCard.js file in our components folder
- We will be using a sample Tailwind card component as shown below:
export function PhotoCard({ feed }) {
 return (
   <div class="flex flex-col max-w-lg p-6 space-y-6 overflow-hidden rounded-lg shadow-md bg-coolGray-50 text-coolGray-800">
     {console.log(4, feed)}
     <div class="flex space-x-4">
       <img
         alt="profile pic"
         src={feed.user.profilePic}
         className="object-cover w-12 h-12 rounded-full shadow"
       />
       <div class="flex flex-col space-y-1">
         <a href="user" class="text-sm font-semibold">
           {feed.user.username}
         </a>
         <span class="text-xs text-coolGray-600">
             {Date(feed.postedAt)}
         </span>
       </div>
     </div>
     <div>
       <img
         src={feed.content.source}
         class="object-cover w-full mb-4 h-60 sm:h-96"
         alt="intro"
       />
       <h2 class="mb-1 text-xl font-semibold">{feed.description}</h2>
     </div>
   </div>
 );
}- To have the newly created components displayed, we will add them to our App.js
import { PhotoFeed } from "./components/PhotoFeed";
import Amplify from "aws-amplify";
import awsconfig from "./aws-exports";

Amplify.configure(awsconfig);

function App() {
 return (
   <div className="App">
     <PhotoFeed />
   </div>
 );
}

export default App;
Creating Our Comment Component
Now, we will create a new file called Comments.js under our components folder.
import { useEffect, useState } from "react";
import { DataStore } from "@aws-amplify/datastore";

import { Comment } from "../models";

export function Comments({ postId }) {
 const [comments, setComments] = useState([]);
 useEffect(() => {
   const getComments = async () => {
     const photoComments = await DataStore.query(
       Comment,
       (p) => p.timelinefeedID === postId
     );
     setComments(photoComments);
   };
   getComments();
 }, []);
 return (
   <div>
     {comments.map((comment) => (
       <div key={comment.id} class="flex">
         <div key={comment.id} class="flex-auto p-1">
           <div class="flex flex-wrap">
             <p class="flex-auto text-base font-semibold">
               {comment.user.username}
             </p>
             <div class="text-sm font-semibold text-gray-500">
               {comment.body}
             </div>
           </div>
         </div>
       </div>
     ))}
   </div>
 );
}
After that, we will go to the PhotoCard.js file, where we will import our Comments and feed the postId in them.
import { Comments } from './Comments'
<Comments postId={feed.id} />
Lastly, we will create a share and like button component called ShareLike.js in our component folder and import it into the PhotoCard.js component.
import React, { useState } from 'react';

export function ShareLike() {
 const [count, setCount] = useState(0);
return (
   <div>
     <div className="flex flex-wrap justify-between">
       <div className="space-x-2">
         <button aria-label="Share this post" className="p-2 text-center">
           <svg
             xmlns="http://www.w3.org/2000/svg"
             viewBox="0 0 512 512"
             className="w-4 h-4 fill-current text-indigo-600"
           >
             <path d="M404,344a75.9,75.9,0,0,0-60.208,29.7L179.869,280.664a75.693,75.693,0,0,0,0-49.328L343.792,138.3a75.937,75.937,0,1,0-13.776-28.976L163.3,203.946a76,76,0,1,0,0,104.108l166.717,94.623A75.991,75.991,0,1,0,404,344Zm0-296a44,44,0,1,1-44,44A44.049,44.049,0,0,1,404,48ZM108,300a44,44,0,1,1,44-44A44.049,44.049,0,0,1,108,300ZM404,464a44,44,0,1,1,44-44A44.049,44.049,0,0,1,404,464Z"></path>
           </svg>
         </button>
       </div>
       <div className="flex space-x-2 text-sm text-coolGray-600">
         <button onClick={() => setCount(count + 1)} className="flex items-center p-1 space-x-1.5">
           <svg
             xmlns="http://www.w3.org/2000/svg"
             viewBox="0 0 512 512"
             aria-label="Number of likes"
             className="w-4 h-4 fill-current text-indigo-600"
           >
             <path d="M126.638,202.672H51.986a24.692,24.692,0,0,0-24.242,19.434,487.088,487.088,0,0,0-1.466,206.535l1.5,7.189a24.94,24.94,0,0,0,24.318,19.78h74.547a24.866,24.866,0,0,0,24.837-24.838V227.509A24.865,24.865,0,0,0,126.638,202.672ZM119.475,423.61H57.916l-.309-1.487a455.085,455.085,0,0,1,.158-187.451h61.71Z"></path>
             <path d="M494.459,277.284l-22.09-58.906a24.315,24.315,0,0,0-22.662-15.706H332V173.137l9.573-21.2A88.117,88.117,0,0,0,296.772,35.025a24.3,24.3,0,0,0-31.767,12.1L184.693,222.937V248h23.731L290.7,67.882a56.141,56.141,0,0,1,21.711,70.885l-10.991,24.341L300,169.692v48.98l16,16H444.3L464,287.2v9.272L396.012,415.962H271.07l-86.377-50.67v37.1L256.7,444.633a24.222,24.222,0,0,0,12.25,3.329h131.6a24.246,24.246,0,0,0,21.035-12.234L492.835,310.5A24.26,24.26,0,0,0,496,298.531V285.783A24.144,24.144,0,0,0,494.459,277.284Z"></path>
           </svg>
           <span>{count}</span>
         </button>
       </div>
     </div>
   </div>
 );
}
Whoops! We’ve finally completed our tutorial. Although this is outside the scope of the tutorial, if you’re interested in expanding the features of the photo feed app, the local setup instructions button has a guide we can use to allow users to create and post photos and comments.

Conclusion
We’ve learned how to create a full-stack app using AWS Amplify, React, and Tailwind CSS in this tutorial. First, we used AWS Amplify Admin UI to design the schema of our app, creating data models and specifying their relationships with one another. After that, we created a React app using the official Tailwind CSS guide. In it, we queried the data models and displayed them as Photo feeds.
To expand your knowledge on the suite of robust AWS Amplify services, please visit the official website and the official Amplify AWS documentation.
You can also find the complete code in this git repo.